
Models Affected
2017 to present model year F-250/350/450/550 Super Duty Trucks with optional Upfitter Switches.
Note: You can find a lot of this information in your owner’s manual. If you don’t have one, you can view the manual online at Ford Owner Manuals
Description
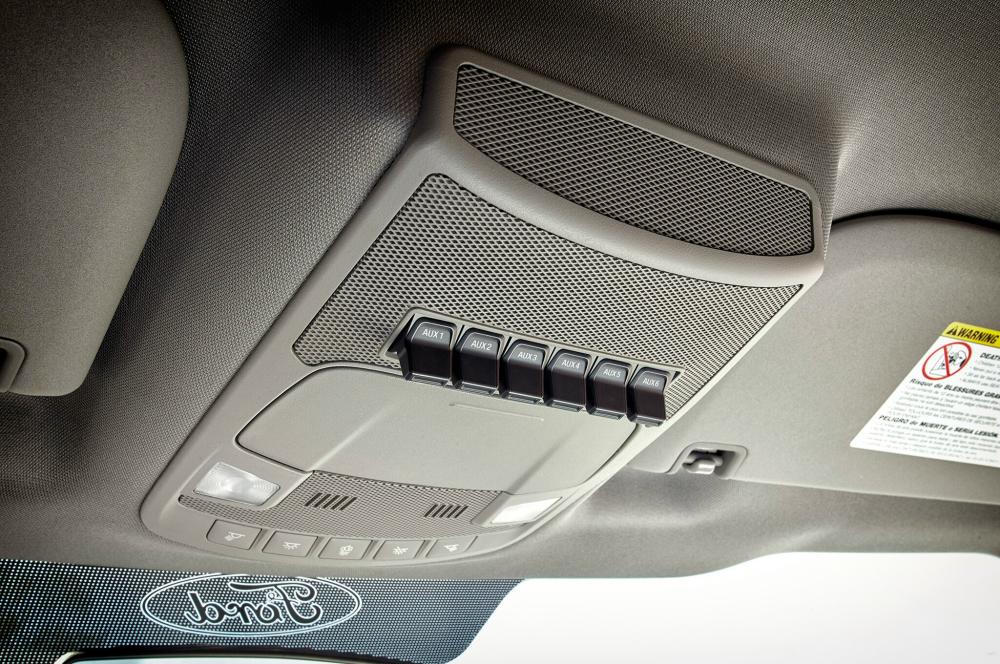
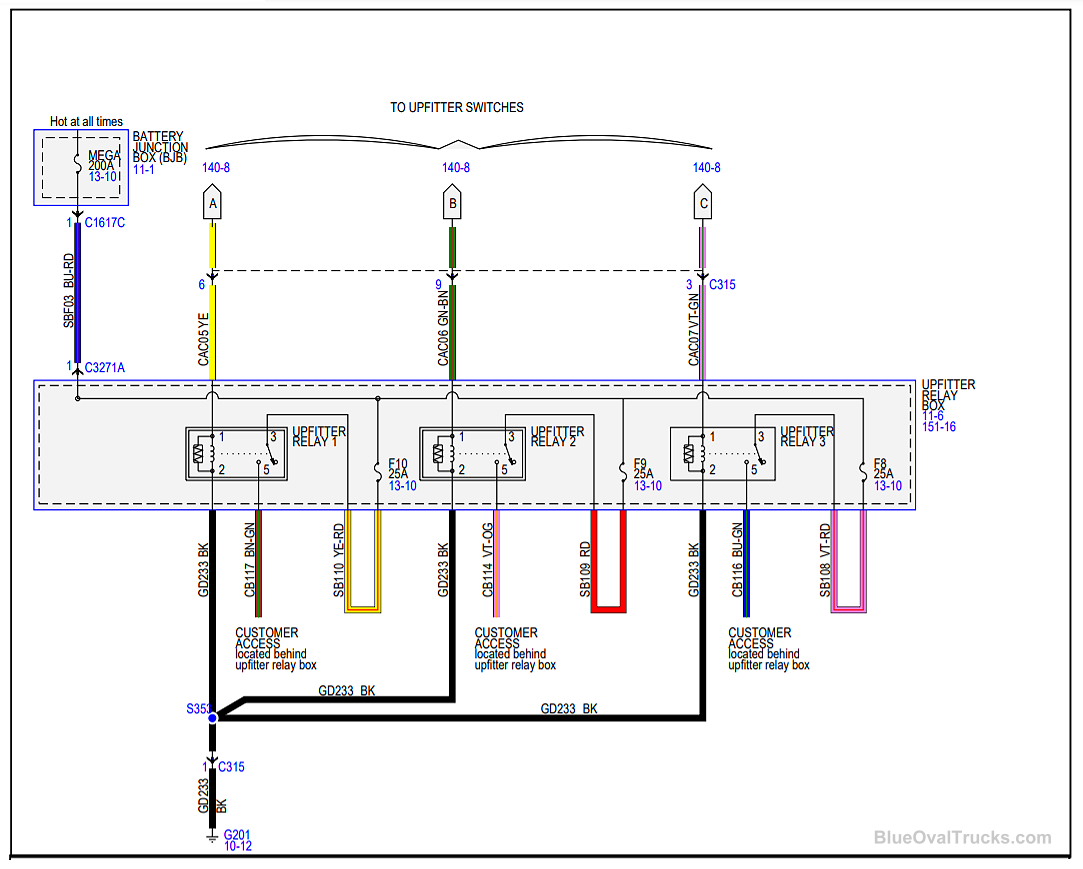
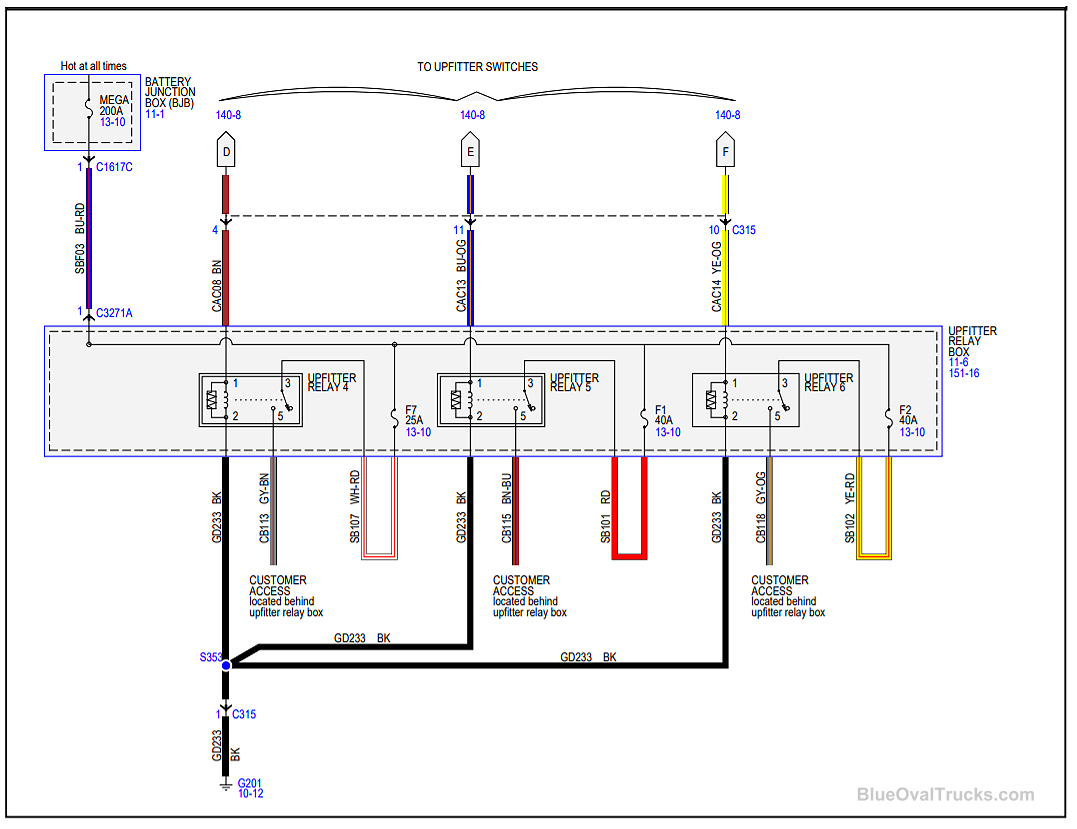
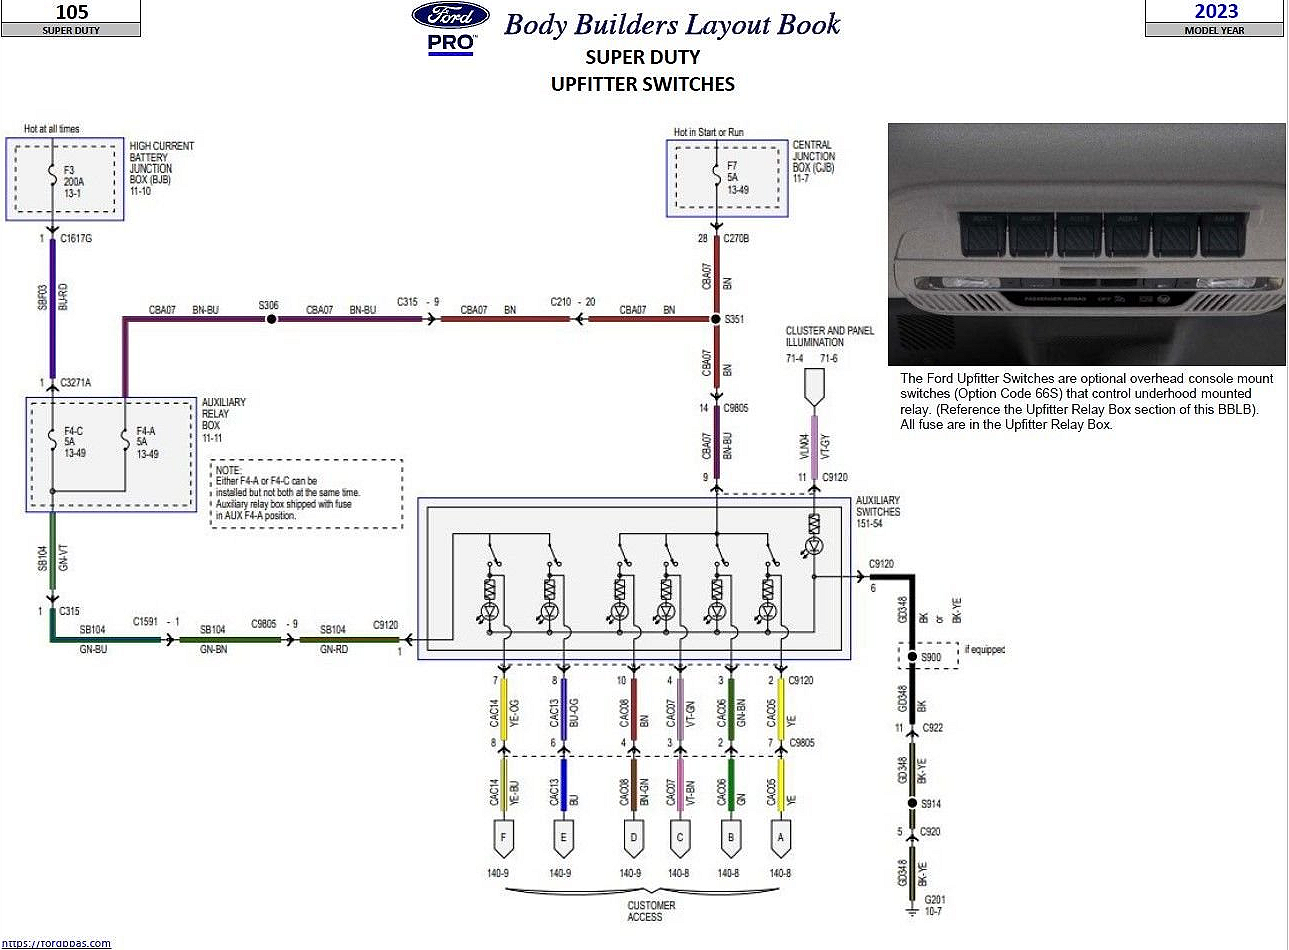
The Ford Upfitter Switches are optional overhead console mount switches (Option Code 66S) that control under hood mounted relays. These relays power six blunt cut wires that are taped on a harness near the upfitter auxiliary relay box that can be found on the driver’s side of the engine compartment. The six blunt cut wires are as follows:
| Switches | Circuit | Color | Fuse # | Rating |
| Aux 1 | CB117 | Brown / Green | F10 | 25A |
| Aux 2 | CB114 | Violet / Orange | F9 | 25A |
| Aux 3 | CB116 | Blue / Green | F8 | 25A |
| Aux 4 | CB113 | Gray / Brown | F7 | 25A |
| Aux 5 | CB115 | Brown / Blue | F1 | 40A |
| Aux 6 | CB118 | Gray / Orange | F2 | 40A |
In addition to the upfitter switch blunt cut wires, this bundle contains the following blunt cut circuits:
| Description | Circuit | Color | Fuse # | Rating |
| Run/ Start Output | CB111 | Brown | F3 | 20A |
| Battery Hot Output | SB106 | Brown / Red | F6 | 20A |
| PTO Relay Control | CE924 | Blue / Green | N/A | N/A |
| PTO Relay Output | CB112 | Green / White | F5 | 25A |
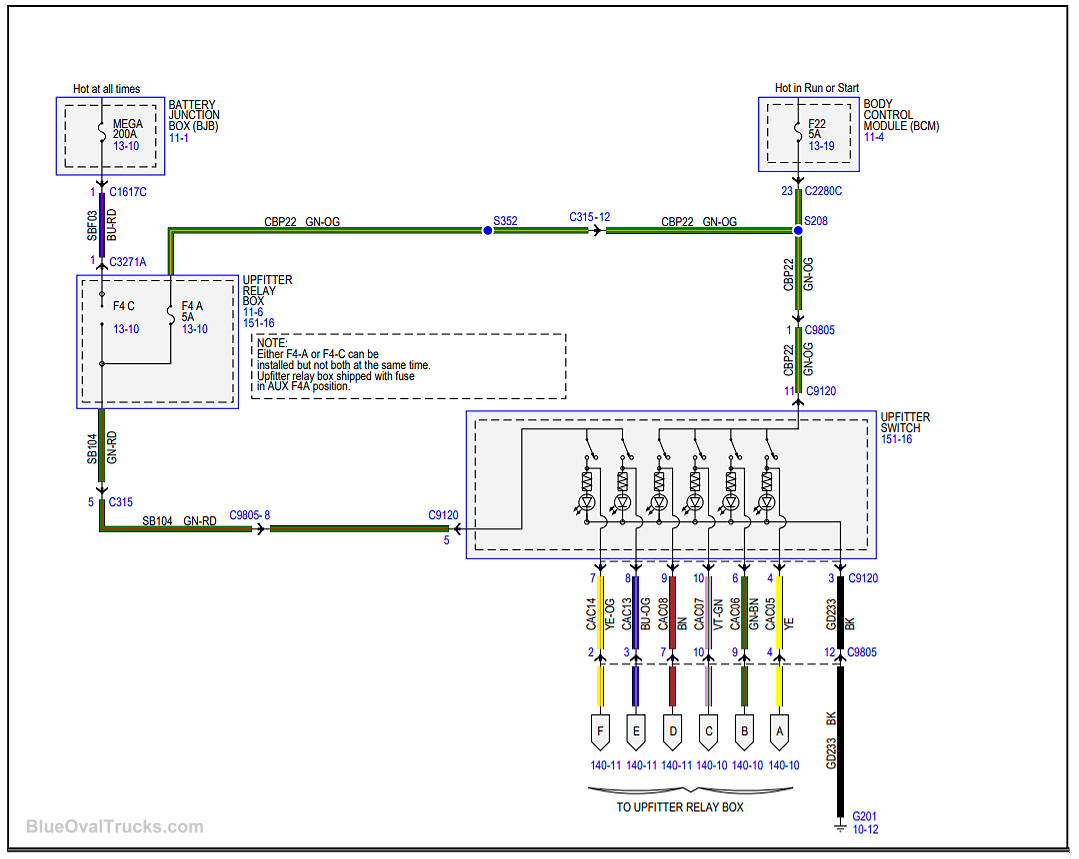
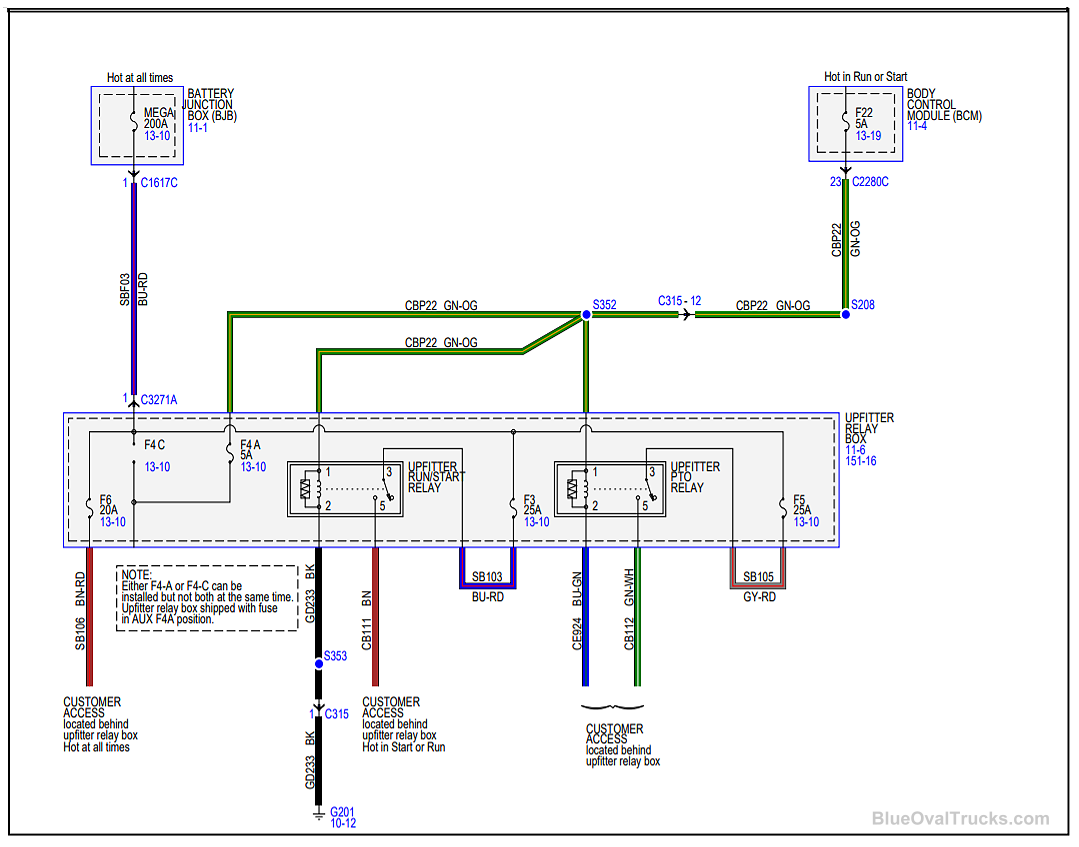
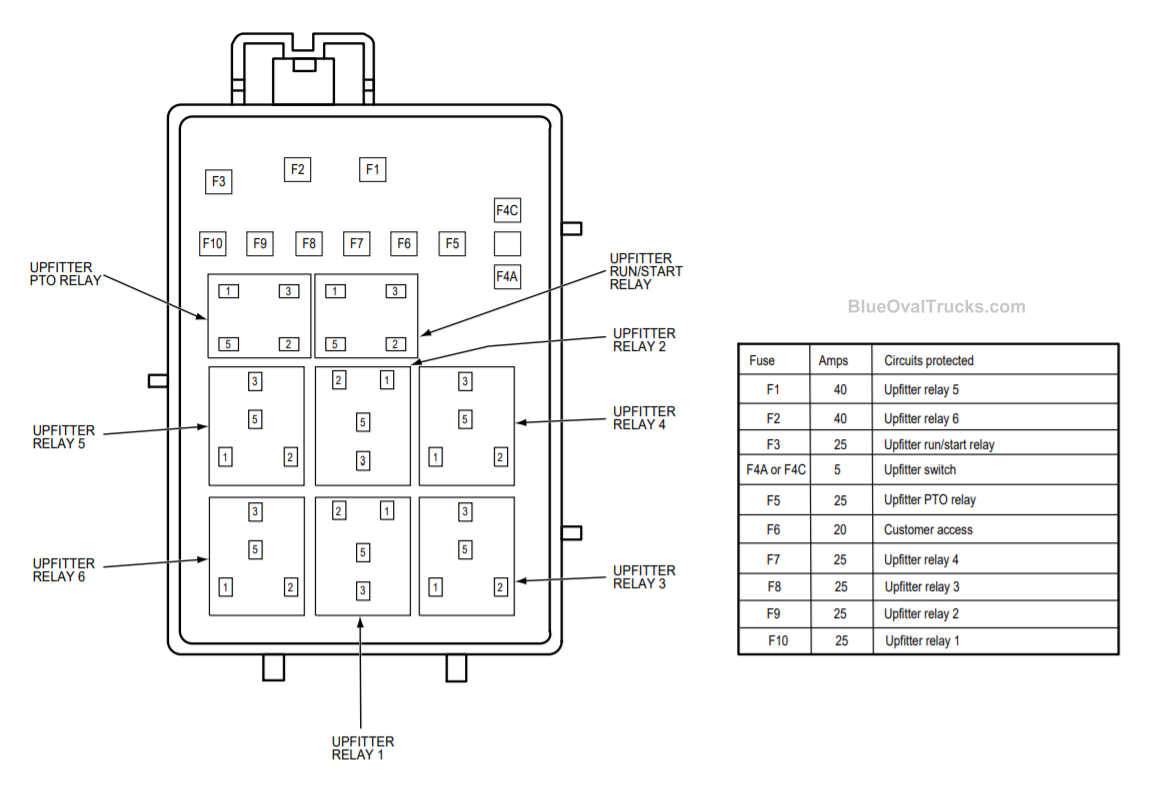
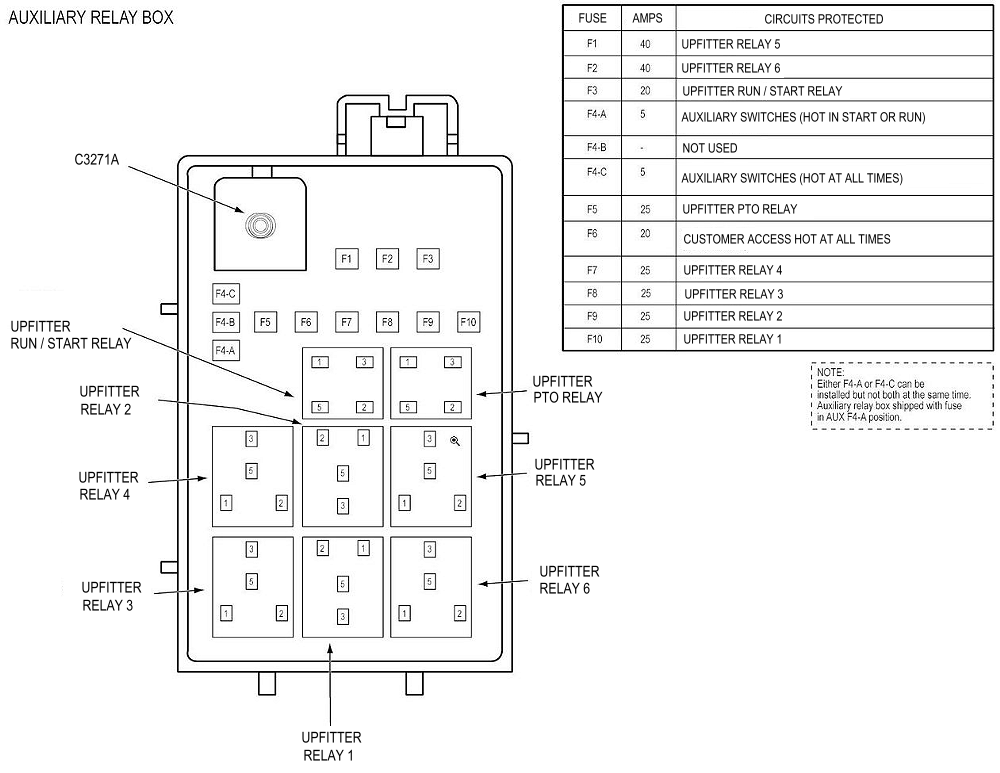
All relays and fuses are located in the upfitter relay box.
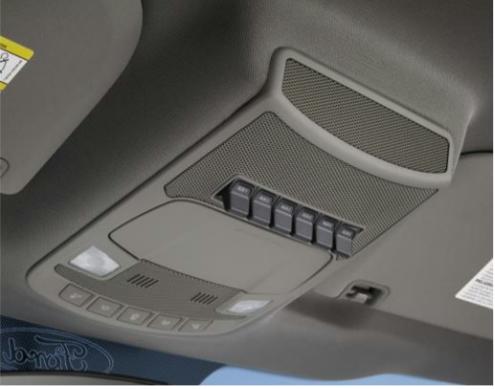
Figure 1: 2017 Super Duty Upfitter switch location
NOTE: Upfitter Switches cannot be added to a vehicle that was not built with this option at production.
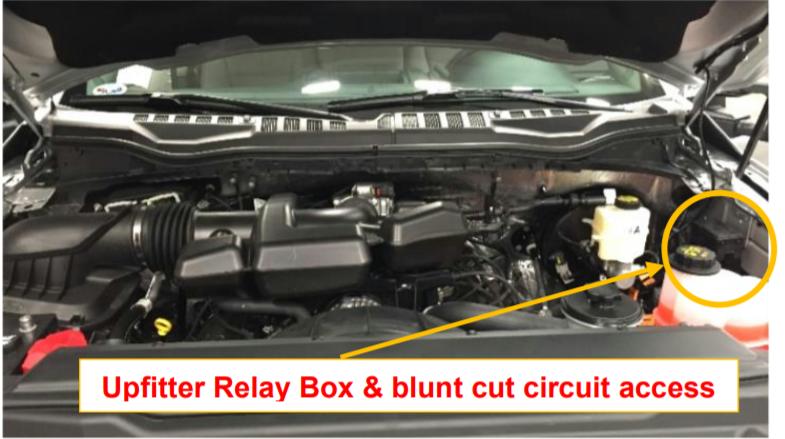
Figure 2: Upfitter Relay Box and upfitter switch blunt cut output location.
Accessing blunt cuts wires:
On vehicles with dual batteries, removing the upfitter relay box will provide additional access to the blunt cut wires.
1. Disconnect the electrical connector.
2. Release tabs and lift upwards to remove.
To reinstall upfitter relay box:
1. To install, reverse the removal procedure.
Configuring Upfitter Switches 5 and 6 to Hot-at-all times.
Upfitter relay box fuse F4 (5A) can be put into one of two positions. In Position A, auxiliary switch 5 and 6, operate with the ignition in RUN or START. In Position C, auxiliary switch 5 and 6 operate hot at all times.
The following procedure describes how to configure #5 and #6 upfitter switches to Battery hot.
1. Remove upfitter relay box cover.
2. Remove 5 Amp fuse located on the lower right-hand corner of the upfitter relay box.
3. Slide the contact guard from position A (left) to position C (right) position.
4. Re-insert 5 Amp fuse into position C (right) position.
5. Replace relay box cover.
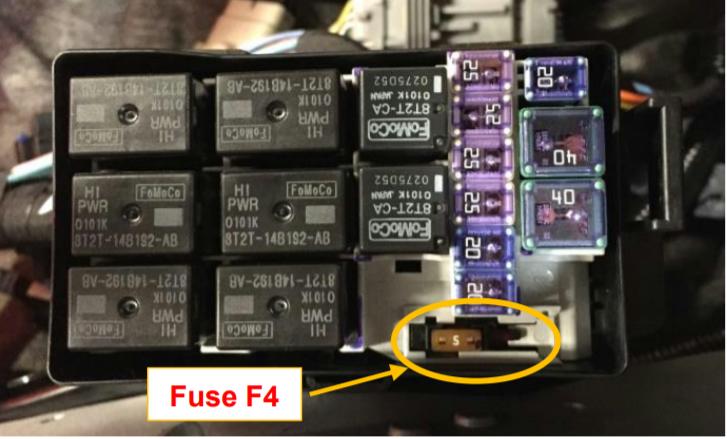
Figure 3: Fuse F4 location
Wiring Schematics
Relay & Fuse Diagram
2023 Auxiliary Switches – Raptor/Tremor (If Equipped)
The auxiliary switchboard on the overhead console makes aftermarket customization easier with six prewired switches connected to the power distribution box. The circuits are individually fused for connection of electrical accessories.
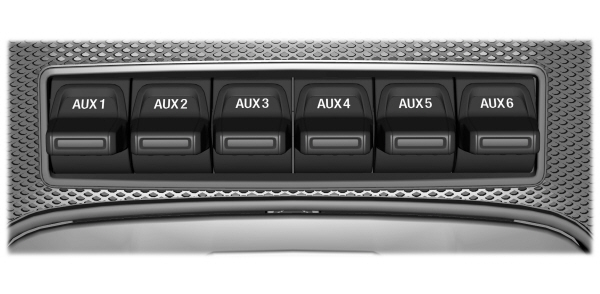
The switches have labels for AUX 1 through AUX 6. They only operate when the ignition is in the on position, whether the engine is running or not. We recommend that you leave the engine running to maintain battery charge when using the switches for an extended time or when using higher current draw accessories. When you turn on a switch, the indicator light on the switch illuminates and the circuit provides power to the device wired to that switch.
AUX switch 1 operates the off-road lamps when your vehicle comes with this option.
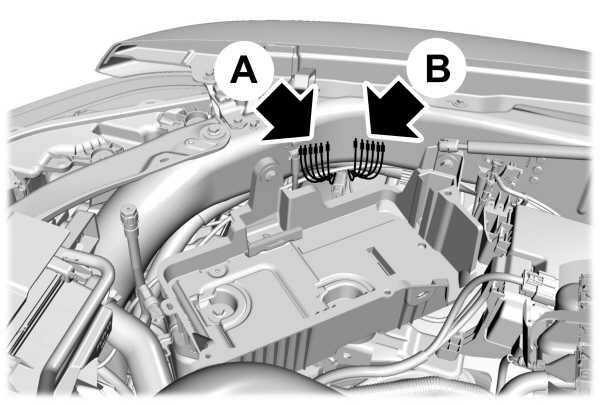
Locating the Auxiliary Switch Wiring
There are three sets of blunt-cut and sealed circuits. Two sets are under the hood and behind the battery tray, and one set is inside your vehicle at the passenger footwell.
The powered set (A) is taped behind the battery tray and has a red spot tape mark.
The second set (B) is also under the hood. It is taped behind the battery tray and has a white spot tape mark. This set routes to the interior passenger footwell.
Remove the battery and battery tray to access the underhood circuits.
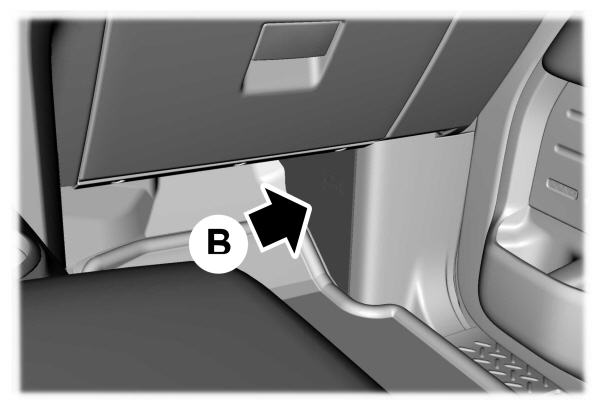
The interior set is taped on a wire harness by the passenger side footwell. This set is the other end of the circuits taped behind the battery tray, with a white spot tape mark.
Remove the fuse panel access door in the kick panel to access the wires. If you do not see them, you may need to pull them down.
| Power Distribution Box | Wire Color | Underhood Pass Through | Wire Color | Passenger Footwell | Wire Size | Fuse |
|---|---|---|---|---|---|---|
| AUX 1 | Violet/Green | AUX 1 | Violet/Green | AUX 1 | 1.0 mm² | 10A |
| AUX 2 | Green/Brown | AUX 2 | Green/Brown | AUX 2 | 1.0 mm² | 15A |
| AUX 3 | Yellow | AUX 3 | Yellow | AUX 3 | 1.0 mm² | 15A |
| AUX 4 | Brown | AUX 4 | Brown | AUX 4 | 1.0 mm² | 10A |
| AUX 5 | Blue/Orange | AUX 5 | Blue/Orange | AUX 5 | 1.0 mm² | 5A |
| AUX 6 | Yellow/Orange | AUX 6 | Yellow/Orange | AUX 6 | 1.0 mm² | 5A |
About The Author
Growing up, my father always believed that every family needed a truck—there’s just something about having a vehicle capable of hauling anything at a moment’s notice. That philosophy stuck with me, and it’s been the foundation of my lifelong passion for Ford trucks.
While I’m best known for my work with Ford Rangers, I’ve owned a wide variety of Ford trucks over the years—including F-150s, F-250s, F-350s, and even larger rigs like the Ford Excursion, Ford Expedition, and a 1982 Ford Econoline Sportsmobile camper van. I’ve used these vehicles for everything from family transportation to towing car trailers and campers, and each one has fueled my love for Ford’s versatility and durability.
I especially enjoy the styling of 1970s and 1980s Ford trucks—the bold designs, rugged presence, and classic charm are timeless. Sharing my passion for Ford trucks, vans, and SUVs with other enthusiasts online brings me a great deal of joy, and it’s why I created Blue Oval Trucks.
This website is dedicated to helping Ford truck enthusiasts explore, learn about, and celebrate these incredible vehicles. While I share my expertise and experiences here, Blue Oval Trucks is an independent enthusiast site and is not affiliated with Ford Motor Company.