
By: Jeff Lucas
Replacement of the T-19 4 speed transmission in a 1985 F-350, with a 6.9L Diesel
This is not intended to be a step by step process for completing this conversion, only a depiction of the process I used to complete the conversion. Oh I’ll tell you about my mistakes, just because they make a good story. I will absolutely NOT accept any responsibility for any errors what so ever, those I will blame on the beverages I will consume in writing this.
So be sure to double check all the information I have included. JEFF
I would like to thank Greg from High Impact for putting together the details of this conversion. I swear as soon as I mentioned it to him, he already had the parts list running in his head and was explaining everything I would need to change to make this project work out. Unfortunately Greg passed away around the end of November 2010. I never met Greg but the few times I talked to him on the phone I knew he was someone I would like. I quickly found out that 10 minutes of talking business and resolving problems turned into another 30 to 45 minutes of just great conversation that I never wanted to hang up the phone.
Greg You Will Be Missed
Conversion kit ordered from High Impact Wheels/Transmission & Gear: www.high-impact.net 888-316-2940
Kit included:
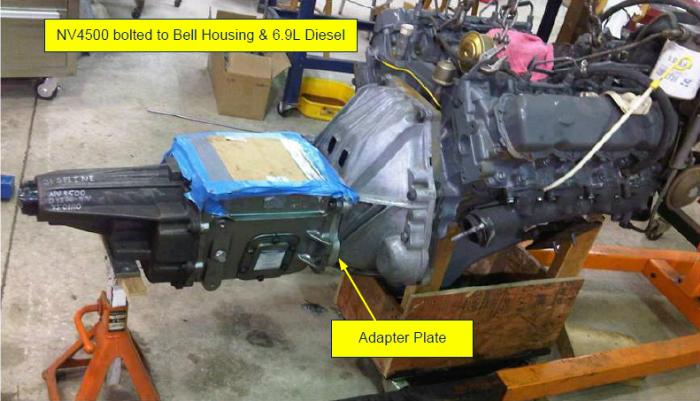
- A brand new NV4500 5 speed transmission. This was apparently built by Blumenthal Manufacturing, http://www.blumenthalautomatics.com in Oklahoma City, OK, 1-888-236-4800. Transmission was built with the early Dodge tail housing to provide me with a mechanical speedometer drive, the 1-1/4” 10 spline input shaft, and the 1-5/8” 31 spline output shaft. Transmission Build Number: D4500-4N.
- 31 Spline Slip Yoke, ordered separately from Blumenthal: Spicer P/N 3-3-4391X, AAM P/N 40039583, GM P/N 15897990
Advanced Adapters Kit, the kit was shipped with:
The Ford clutch, flywheel and pressure plate were sent to South Bend Clutch http://www.southbendclutch.com/ in Mishawaka, IN, 1-800-988-4345. South Bend re-drilled the flywheel to accept their 13 inch clutch with the 1-1/4 NV4500 10 spline, and their 13-inch pressure plate. Unfortunately for me, my flywheel was badly cracked and I had to have South Bend sell me another, (and the hits just keep coming)
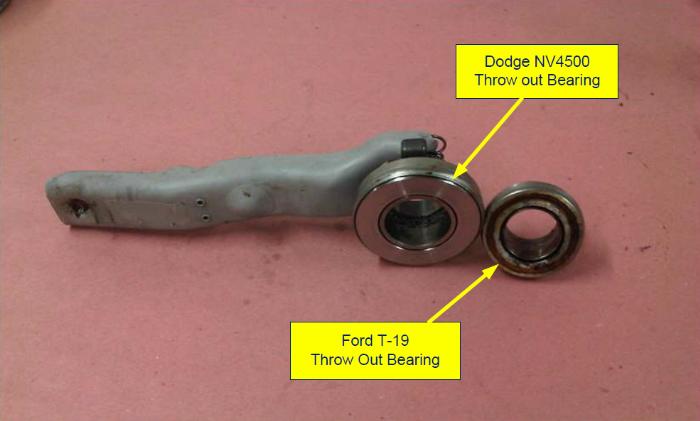
I purchased the clutch release bearing (throw out bearing for us older types) from my local Auto parts store for a 1992 Dodge with a Cummins Diesel and the NV4500, The bearing is a Timken P/N 614070.
So Much for the easy part, it was just money, OUCH! Did I just say that, so far I am into this project $3790.00, believe it or not I would be another $1000.00 if I had installed the ZF 5 speed and would still need to do about the same amount of work to make it fit, or so I’ve been told.
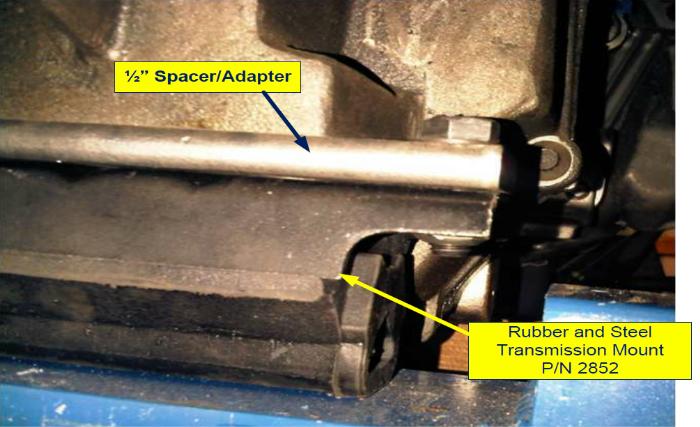
Ok right off the bat I notice that the transmission’s mount did not fit the mounting holes on the transmission. My first thought was wrong mount! (loud Buzzer noise) WRONG! Turns out I needed to make an adapter plate since Dodge uses some proprietary adapter between the mount and the transmission which I did not have the room for anyway. This turned out to be easy, just a piece of steel 1/2″x2″x8-3/4″ drilled with two 5/8″ holes, one on the end to bolt to the mount (I used 1/2-inch bolts but the 5/8″ hole made the final alignment much easier) and two counter sunk 7/16 holes 4-inches apart, 2-inches either side of center length wise and on the 1-inch center line of the 2-inch width. It took me longer to find the counter sunk Allen bolts than it did to make the adapter.
Now I get to do the really fun part. Since I am unable to bench press 250 pounds with one arm I decided to pull the engine and T-19 transmission out of the truck. This will be the third time in less than 1 year and I am getting pretty quick at it now, but that’s another story. Once I had the engine and the T-19 out I removed the clutch, pressure plate and flywheel and sent them to South Bend Clutch, I am not sure why they needed the complete clutch system but as I said earlier they did find that my flywheel was NFG I also feel sorry for the UPS guy that had to carry that box more than 5 feet. Now I am ready to start making measurements, the transmission mount for the NV4500 is 4-inches further back than the T-19 and with the ½ inch adapter and the rubber mount it is also 3-inches higher.
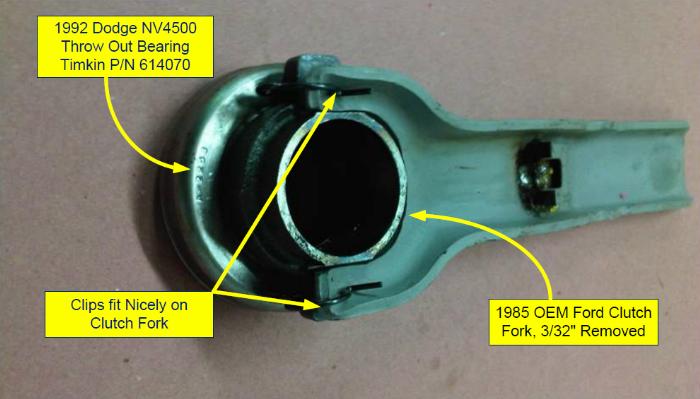
My next problem showed up when I looking at the throw out bearing, compared to the Ford bearing, it is quite a bit larger and it is designed to clip onto the clutch fork not just ride in place and rattle around. So again after a lot of wasted research time looking for a clutch fork that would fit the Ford bell housing and the Dodge throw out bearing I went to talk to a machinist friend of mine (always good to have one of these especially when they let you use their machines). I was going to try and make a custom fork (Loud Buzzer noise, again) WRONG! After about two seconds of looking at the fork and the Dodge bearing (OK may it was 10 seconds) he asked me why I don’t just shave off 3/32″ around the inside of the factory Ford fork and the clips on the bearing would just snap over the existing curved ends. OK, I could do that with a rotary file (the audience is now laughing out loud, you’re in a machine shop moron). We just clamped the fork into the end mill and shaved off the 3/32 in about 3 or 4 minutes, this turned out to be the best idea since the fork was made out of some pretty hard steel. The clips most definitely hold the bearing securely to the fork. I did verify this change with South Bend Clutch a couple of days later and they agreed that this should work just fine since the new 13-inch pressure plate would not be significantly harder to engage than the factory 11-inch pressure plate.
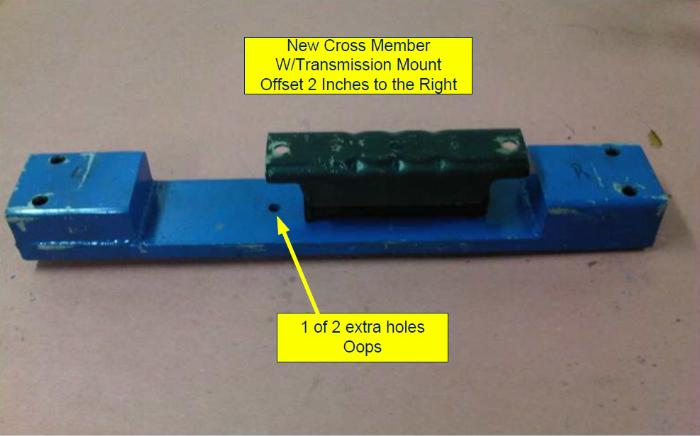
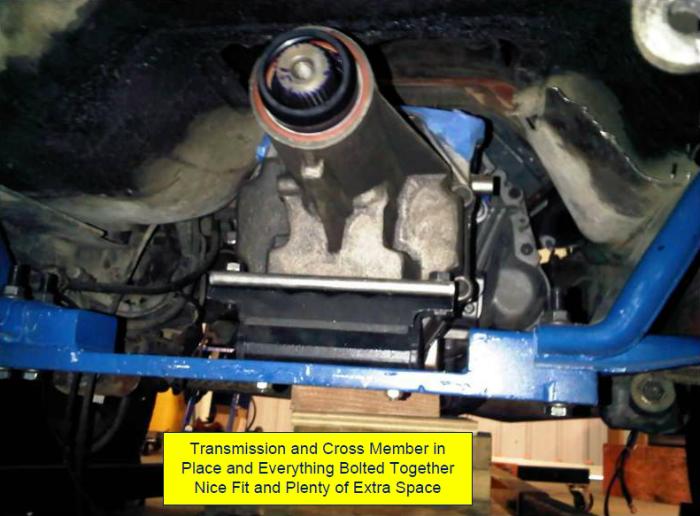
After measuring out the clearance I needed for the new transmission I discovered that I needed to lower the cross member 3-inches to maintain the output shaft at about the same height from the ground as the factory T-19,so much for being able to use the factory cross member and just moving it back. I thought about just flipping the cross member over, but the way it is made from Ford, it just looked like a place for mud and debris to collect and rot the transmission mount. My solution was to cut the center section out of the factory cross member leaving an extra 1 inch of material beyond the factory holes. Due to the 1-1/2 inch up curve of the factory cross member I only needed to make a spacer that was 1-1/2 inch thick. I just cut two pieces of 1-1/2 x 4 channel 3-inches long and welded them to a piece of 3/4″ x 3″ x 22″ plate steel and drilling two holes on each end to match up with holes on the remaining cross member end pieces. I then drilled holes for the two 10mm studs on the other end of the rubber mount and drilled a 7/8-inch flat bottom counter sink for the 10mm x 1.5 locking flange nuts in the 3/4-inch plate. OK neither I nor the audience caught this error, the entire drive train on a 1985 F350 with a 6.9L diesel is offset two inches to the right of center, OH FUDGE!
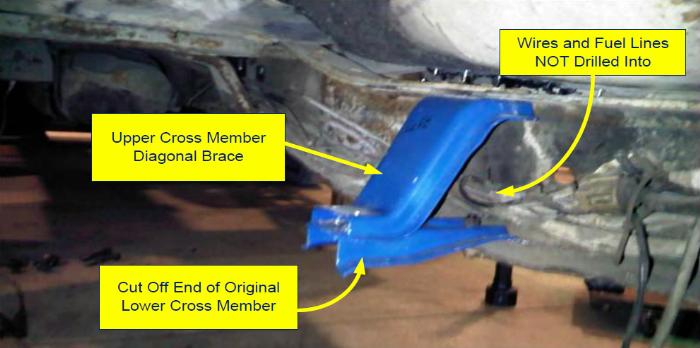
I discovered this when I was measuring for the new cross member design and then promptly forgot about it and did not remember until after I had set the engine and transmission in place to determine where I needed to drill the new holes in the frame for the cross member’s new location. Now with the holes in the correct place and the lower half of the cross member bolted together the engine on its mounts and the transmission supported by blocks I marked and drilled the holes in the lower frame, 1/2-inch holes one on each side. Drilling while laying on my back and pushing up sucks, suffice it to say these two holes took an hour and a half each and how I broke a 3/8″ drill bit I still haven’t figured out, but I got them in and I was able to miss the wiring and fuel lines that run along the left side frame rail. Now I am ready to drill the four holes for the upper cross member brace supports, two on each side. After the experience I had with the two lower holes, I decided to cut holes in the floor to allow me access to the top of the frame rails; hey I have rust holes that need to be repaired any way. So using the original upper cross member brace pieces (these are a 45 degree angle brace the connects the upper frame rail to the cross member and actually appear to be the primary strength for supporting the transmission) as my guide I measured and drilled the new holes, I also drilled the existing holes in the upper cross member braces to 5/8″.
As it turned out this worked well since either I can’t drill straight or I can’t use a tape measure and the extra space of the larger holes was just enough room for everything to fit together snugly without resorting to the use of a hammer. Now for the best part; cutting the floor, drilling the four holes in the frame, enlarging the holes in the upper cross member brace, bolting everything together, the transmission being supported by the new cross member assembly, and patching the holes in the floor only took an hour and a half and one broken 1/16″ drill bit. All that work in the same amount of time as took to drill one hole upside down. So now once the floor mat is back in the only person that will see these patches will be the guy that builds my new exhaust system, but that will be later.
At this point I sent the drive line out to have it shortened and to have the 31 spline slip yoke installed. The drive line should be done next week???. I should point out that things are about to go wrong,, I think???. The guy at the driveline shop didn’t know what an NV4500 transmission was and said he would have to “Do some looking” to find the slip yoke. I called Monty at Blumenthal’s about the slip yoke it was supposed to have been part of the original order and he would get me one. Well as it turned out the slip yoke was not part of the original order so I had Monty ship me one, just another added cost. I did try locating one on the Net, but all I can tell you from that wasted research is that the 31 spline slip yokes do exist and no one that sells them, lists them by part number to application. Oh just buy one from Dodge you say! Hmmm,, I dare you to find a Dodge dealership parts department that is still able to look up parts without the correct VIN. I am sure there is a Dealership Parts Department that can do it, just not close to me. This is about installing a Dodge transmission in a Ford.
Now I need to remove the engine and transmission (again) and wait for the clutch parts to return. Well so far I am seven days into this project and have even been able to accomplish a few things on my honey-do list, chased down miscellaneous nuts and bolts, researched parts I really didn’t need or able to buy and had some machine work done. Not too shabby but good thing I am not paying myself shop rates to do this. Now it is two weeks later the clutch, pressure plate, and flywheel have been received, UPS needed a signature so I had to pick them up at UPS. OK I didn’t pick them up the wife did, her only comment was “I thought you said these were heavy?” She may have said that, but she didn’t unload them from her truck for me. I’ll check them out this weekend, but I have every confidence that they will be just fine. The price was higher then I wanted but I did have them ship my old clutch and pressure plate back, they had less than 500 miles since I put them in, maybe I can find someone to buy them. I let South Bend keep the cracked fly wheel, yes yes I know how magnanimous of me.
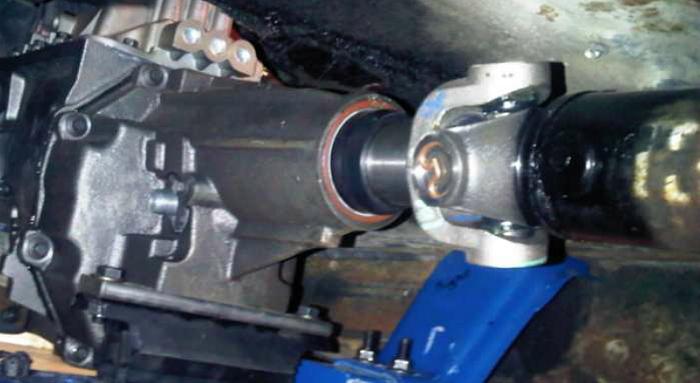
The slip yoke also showed up and it fits just fine. So now I’ll get this yoke to the drive line shop and one more piece of the puzzle is in place. So here is the part number, since I had my little ranting meltdown Spicer Part Number 3-3-4391X. It also came packaged in a box from American Axel & Manufacturing with the part number 40039583 which AA & M shows on their web site as a 31 spline slip yoke for 2006+ full sized GM trucks with the GM part number 15897990. So now I have gone from not finding the part number I needed, to knowing 3 different part numbers from 3 sources and not one of them is a Dodge P/N, well another lesson learned. I did look up the Spicer part number and that one was a little confusing, it is listed as a 30/31 spline slip yoke. How can it have two different spline counts for the same part number? The GM output shaft seems odd too since I am supposed to have a Dodge output shaft. Things that make you say, “Hmmm”.
I installed the transmission and the clutch to the engine, pretty straight forward and simple if you have ever installed a clutch before. I am soo glad though that I didn’t try to do this laying on my back under the truck, this thing is heavy. Using a couple of 8 inch long bolts with the heads cut off I threaded them into the top bolt holes in the adapter plate mounted to the bell housing. These made a perfect guide and support for the transmission. I also found that the output shaft is threaded for a 1/2 inch fine thread. Using a 1/2 inch bolt and a couple of jamb nuts worked perfect for turning the main shaft for aligning the splines and slipping the end into the pilot bearing. It slid together like a greased pig, whatever that means. I did measure for what my clearance between the shaft end and the crank was. I ended up with only 1/4 inch. I also ended up with only 1/8 inch between the pilot bearing and where the splines start on the main shaft. I suppose I could have pressed the bearing in a little further, but I didn’t.
Well I went looking for the speedometer gear and sleeve,, and guess what? They are no longer available from Dodge! According to my local dealership none of the mechanical speedometer drives are available. Of course even though I had the part numbers I don’t have a good VIN so no way to cross to any updated part numbers, grrrrr. Good thing I just happen to have an old Dodge four speed transmission laying around with a good gear (35 tooth) and sleeve. These went in like they were made for the job, imagine that. I did happen to find some places on the web that have the gears so there are still options available. This site appeared to have the most gears in their inventory:
http://www.transmissioncenter.net/speedometer_calibration_______va.htm
I don’t know anything else about these guys other than they appear have a good selection of the Dodge long shaft driven gears. I have the engine and transmission back in the truck now and it went back in smooth as silk, as it should since this is the fourth time I have done this. Now for the next head scratcher, the clutch slave cylinder. It would appear that since I used a Dodge throw out bearing and the Ford clutch fork I now have a space problem between the slave cylinder rod and the Fork, the rod is now 1 inch too long,, oops again. Actually not a problem, I just made another one an inch shorter. This is just a piece of 3/8 inch stainless steel rod cut to the correct length and the ends rounded to match the original, sanded and polished smooth.
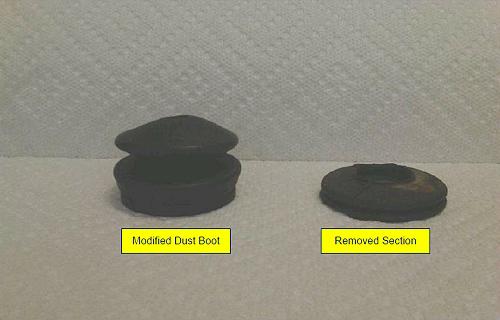
Now the Ford hydraulic clutch has no means for bleeding air so getting it to pump up correctly took more time than making the new rod. Also the rod into the Clutch master cylinder, under the dash, was way out of adjustment, I am surprised that it worked at all with the old clutch, maybe this is why it was so hard to get into gear, hmmm. I’ll see how this works once I get it running again. I also had to modify the dust boot for the slave cylinder pretty easy to do, after looking at it for awhile. I just cut out the center sections and over lapped the ribs of the two remaining pieces and VOILA! I now have a shorter dust boot, just a couple dabs of silicone adhesive and it should work just fine.
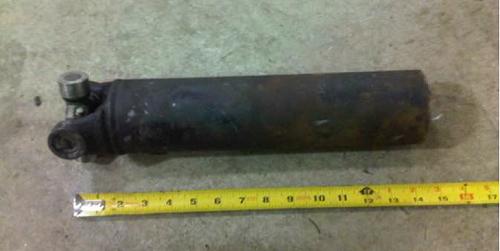
I picked up the driveline today, Looks good I guess things didn’t go wrong. I went ahead and had a new carrier bearing installed, and had the driveline spin balanced with both halves. I must say that Spicer slip yoke really looks great. I should have it installed this weekend and I’ll get the floor pan modified for the shifter and I’ll be just about done, maybe. Just as a piece of added information the new slip yoke uses a 1410 series U-joint.
The drive line shop had to shorten my driveline by 15 inches.
The Drive line slipped in just like it was supposed to no problems there.
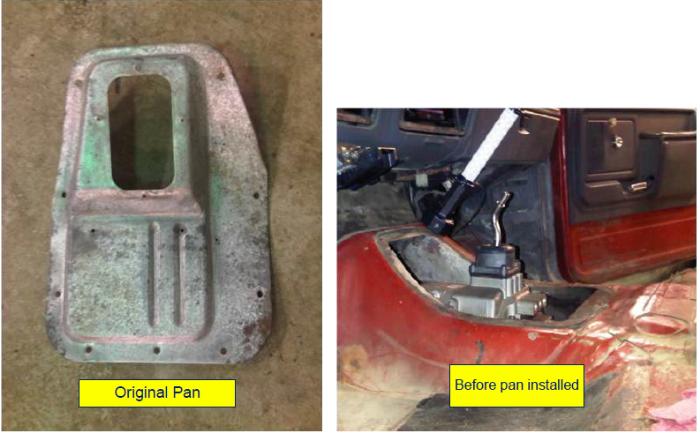
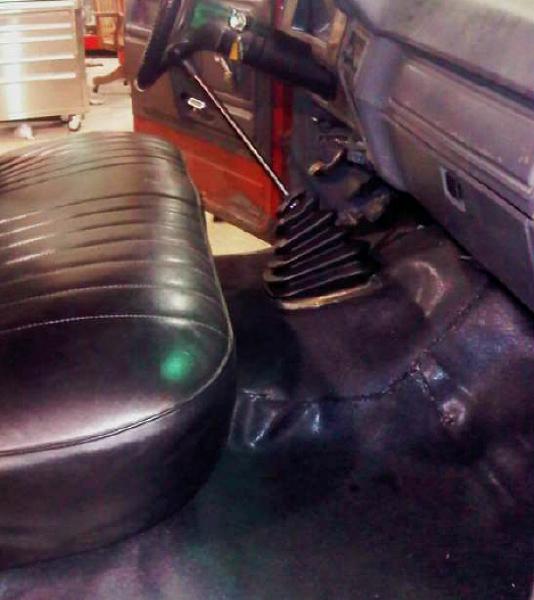
Oh but modifying the floor pan to fit around the taller shifter was a nightmare. I think I’ll invest into some better sheet metal tools, 6 hours was a little too much. I did finish it though and it looks good.
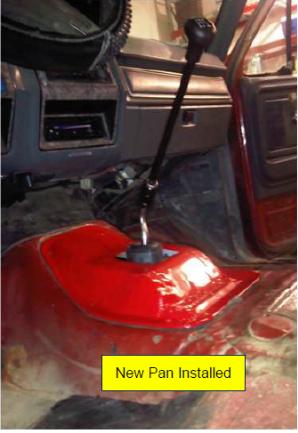
I ordered the plug for the backup lights since the Ford plug won’t fit in the NV4500 switch. AC Delco part number PT107 and/or NAPA part number EC-152. I picked up the plug from NAPA and as suspected it was a perfect fit, no surprises there. Hurray the new floor mat is installed! My original mat was completely wasted and torn up so bad that I figured I would put a new mat in. I should have bought the expensive mat it might have fit better. I ended up buying a plastic welder and I had to cut and then weld the mat to get it to fit the floor. I also used my heat gun and 6, 20 pound weights (I wasn’t using them for anything else) to form the heavy vinyl to the contours of the floor. I figure I spent about 40 hours total over four weekends to get the fit I wanted and it looks pretty good, most of the weld seams are hidden under the seat any way, and I thought the floor pan modification sucked. Although it does resemble Frankenstein’s face just a little (The Frankenfloor). Hopefully with the new mat and the new floor insulation it will be a little quieter in the cab. If it weren’t for all these little nice to have upgrades I would have this truck finished already.
As a side note the mat really did make this job look a lot better and who knows what I will track into the cab, think horses, sheep, cows, pigs, chickens, you get the idea. This is why I didn’t put down carpet; it is still a work truck after all. I was going to replace the shifter boot with new, but hey a little Armor All and it looks just fine, fine as frog’s hair.
I went to dodge and picked up the synthetic manual transmission oil, the guy at Dodge said he gave me a discount on the price, only $23.00 a quart what a deal, Dodge P/N 4874459. I wish the Chevrolet Dealer had it in stock they only wanted $20.00 a quart, Chevrolet P/N 12346190. While I was looking around for the oil a lot of places were trying to sell me either Amsoil or Royal Purple I have read that some guys have been using either one with good success, but I figured I would spend $100.00 to save a $3500.00 transmission and avoid pulling it back out for a little while. The book says 4 quarts are needed, actually it is a little less about 3.75 quarts. As it turned out, because of the way I pumped the 4 quarts into the transmission, when I pulled the pump tube out of the side of the transmission, about a cup of that liquid gold poured out and onto the floor, what a waste. Of course what was I going to do with one cup ($5.75) of oil anyway?

At this point you can skip to the end, the transmission is in, the rest is what I went through to get the truck back on the road, or you can continue reading. O.K. you were warned.
I also pulled the speedometer cable out, I am just going to get a new cable and housing made, 6ftlong, Ford Clip ferrule on the upper end and the 7/8 nut on the lower. Once I get that back in I’ll figure out what I need to do to get the speedometer calibrated, hopefully I can do it with a gear and won’t need to put an adapter on. I know adapters work just fine, but it is still another part that can fail.
The speedometer cable is installed it was sort of like Staples “That Was Easy”, hmm a one sentence paragraph.
So the exhaust does not fit, not a big surprise. What was a big surprise was having one of the bolt ears break off of the driver’s side exhaust manifold, @#%$!@ and ^%$#@!*& completely useless now. To make it worse I had just replaced both manifolds less than a year ago, good thing I kept the notes from the engine swap. A new one is now on order, Oh Boy. The broken manifold was not a show stopper and I got the exhaust cut and spliced to fit, this should be good until I can get it to the muffler shop and have the exhaust re-done in 3 inch. So now just because I haven’t delayed this project long enough I have decided to have the radiator redone while I am waiting for the new manifold.
Just in case you were wondering about taking the manifold out it was a challenge but not too difficult, now the right side manifold would have required me to pull the engine AGAIN! That would be the two inch shift to the right thing.
I picked up the radiator today $50.00 to have it cleaned and pressure checked everything was Okey Dokey. The estimated cost for a new radiator was $300.00 (Plastic and Aluminum) or if I had wanted to have mine re-cored it would have been $800.00 for all new copper core. So I should, barring the un-foreseen, have a radiator that will last for many more years. Hopefully this was money well spent.
So the exhaust manifold has shown up and it looks as good as the first one I bought, yes it is made in China. The casting looks as good as anything else I was able to find at half the price and it is actually heavier that the stock one I took out last year, only time will tell. So bolting this thing back up went mostly easy, I couldn’t get my torque wrench in to torque the bolts down but my book only shows 45ft/lbs. Just a little hat tip to 1AAuto.com, I have made three purchases with them and no complaints. While I was installing the exhaust pipes I found that the other manifold had a stripped stud and I couldn’t thread the nut back on, I must have messed the threads when I dropped the exhaust pies. So anyway suffice it to say that after several attempts to remove the stud (Yes I did use anti-seize when I installed it before) I finally welded a nut to the stud and it unscrewed just like it was supposed to and installed a new stud (No it was not a surprise that I had an extra manifold stud with all the crap I have in old coffee cans around here) and bolted the exhaust back in place.
So now I have the batteries to install, I still need to get the hood back on. So with any luck the next few paragraph will be about me extolling the virtues of the New Ventures 4500 5 speed transmission mounted behind a Ford 6.9L diesel engine, fingers crossed.
&%$#@!*&^%$#@!, the transmission won’t go into gear with the engine running. More of my “lugubrious litany of woes”, (Detroit Bob). Alas fear not after dwelling on this most recent unsettling development and scrutinizing the evidence of miscalculations, I was able to develop a solution that was elementary in its simplistic design. PUT THE ORIGINIAL PUSH ROD BACK IN THE CLUTCH SLAVE CYLINDER. Moron, but let me be clear (that moron thing pops to mind again) this was a lot easier to figure out than it was to replace it. I had to push the release fork back, block it in place, make a little longer push rod install it and block the clutch release fork again to allow enough space to get the slave cylinder back in with the original push rod. The customized dust boot is still the correct size when the clutch pedal is released. So this paragraph was a bonus for anyone reading this far.
Aside from the missing fan fare and drum rolls, I took the truck down the road and onto the freeway and it looks like 5th gear is a bonus, I was zipping around at 60 MPH and only turning about 1800 rpm on the tachometer, and it didn’t even sound like the engine was trying to tear itself apart. Since the tachometer was a junk yard pull out and who knows if it reads correctly, I have no idea what I was actually turning at 60 MPH before I installed the tachometer, but I should be able to figure it out by using forth gear. So now the next step is to get the speedometer calibrated and get the exhaust done. I CAN NOW DRIVE MY TRUCK AGAIN. It still shifts like a truck but a much tighter pattern than the T-19. So there is still more to come in the following weeks.
Oh one more side note: the Frankenfloor has made the inside of the cab quite noticeably quieter. So the speedometer has been checked out, it is a little off, 60mph indicated, actual speed 58mph. I think I’ll leave it that way, my nephew drives it on occasion and since I still remember what it was like to be 19. My thinking is this way, when he thinks he is getting a ticket for 20 over it will only be for 18.
Well it is time to end this little diatribe; hopefully this gave the reader an idea of what it takes to put the NV 4500 into an 85 F-350 2WD. I would imagine that this would be the same for any F-250 or F-350 1980 to 1986 of course the basics would be the same for just about any truck replacing a four speed transmission. In hind sight maybe the ZF would have been easier to install, but I’ll let some else write that one unless I get another project truck.
Thanks for reading,
Jeff L.